The "Barney" Brewstand
As I’m slowly ramping up my system to 10 gallons, I gave some thought to how to best set everything up. Right now the night before brew day consists of gathering up all of my equipment and moving it to the back yard. This involves a bunch of lifting and carrying, both out to and back from, and I’m not as young as I used to be. I needed something to help ease the load.
The November 2007 Brew Your Own magazine featured a brewing system called the “Brutus 10” that used a DIY (do it yourself) welded stainless steel frame which held the burners, pumps, pots, etc. It’s a very popular plan, and has been copied and imitated over the years. My problem is that my welding skills are zero.
Then I stumbled upon the “Wallace”, weldless brew stand made from galvanized angle iron. Now this is closer to my skill set!
| As all of the stands that I’ve seen on-line have been named (“Brutus”, “Wallace”, “Popeye”, etc), I decided to name mine as well. In homage to Homer Simpson’s best friend and drinking buddy, I give you “Barney”. |
So I ordered the parts from McMaster-Carr’s website:
| Qty | Part# | Description |
| 4 each | 8968K26 | 1-1/2″ X 1-1/2″, 6’ length |
| 7 each | 4664T65 | 2-1/4″ X 1-1/2″, 6’ length |
| 16 each | 4664T22 | Steel Corner Plate, 6″x 6″ |
| 2 pack | 4664T61 | Bolts W/nuts & Washers |
| 4 each | 8789T42 | 400 lb. capacity caster |
Next, I stopped by my local big-box hardware store, and picked up some 7-1/4″ cutting disks for my portable miter saw. My plan was to make the stand large enough to contain my two Blichmann free-standing burners, which have 24″ extended legs, so I opted to make the stand 6′ long, 22″ deep, and 25″ high without the casters.
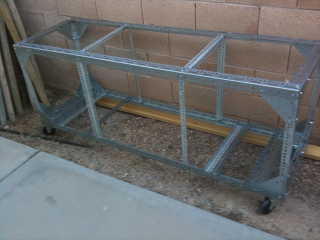
I cut the angle iron and bolted it all together in just a few hours on a late saturday afternoon:
In retrospect, I should have ordered two more casters for the center of the frame, and more angle iron. Oh well, off to the big box hardware store to get more angle iron and some casters (BTW, the angle iron was significantly higher at the big box store, so plan ahead).
Got to do a little more work on it on Easter Sunday.
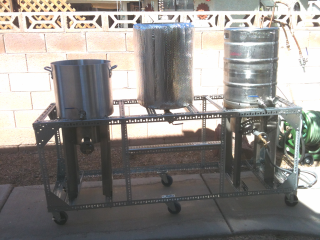
Added two more casters, the shelf for my Insulated Mash Tun, and a bracket for my RIMS Tube. Still need to work on pump placements, natural gas hookups, and wiring, but here’s a photo with the Hot Liquor Tank (HLT), Mash/Lauter Tun (MLT), Keggle and burners.
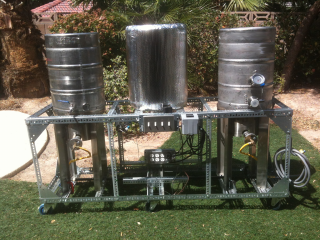
Added electronics, natural gas pipe, and burners. Waiting for parts to mount pumps.
The switches at the front are low voltage controlling 25-amp solid-state relays (SSR) at the back for the RIMS and pumps. An Auber Instruments PID is mounted in the grey box.
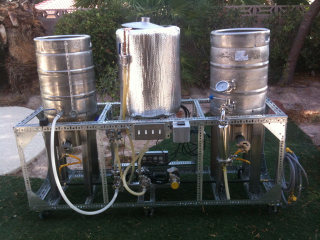
I finally got the remainder of the parts to complete Barney, my weldless brewstand. Here’s an updated photo:
I had leak-tested everything, run some preliminary tests, and everything looked good to go, so I decided to make some beer.
I just picked up a 50lb sack of Maris Otter barley from UBottleIt, and have been enjoying English IPAs lately, so I decided to try to brew one myself.
The recipe is pretty simple:
|
I loaded up my HLT with 14gal of RO water, added some 5.2 conditioner, and turned on the gas. While the strike water was heating, I conditioned and ground the malt. Once the strike water was up to temp, I transferred the water to my mash tun, fired up the recirculating pump and RIMS, and started adding grain.
I had added about 3 lbs of grain when the recirculating flow suddenly stopped, and the RIMS temperature started to climb rapidly. This is not a good thing, so I quickly shut down the RIMS and pump and started to investigate.
A quick check of the silicone tubing going to the pump showed that it was full of grain. I suddenly realized that I had completely forgotten to put the false bottom into the mash tun, a stupid rookie mistake.
Now I had to:
|
This took the better part of 2 hours to complete, but since I use tri-clamp fittings for the Mash Tun, pump head, and RIMS tube, the actual disassembly, cleaning and reassembly was easy.
After about an hour in the Mash Tun, I transferred the wort to the boil kettle and fired up the gas. I then batch sparged the grain with about 6gal of strike water, recirculated for about 15 minutes, and transferred that to the boil kettle, for a total of about 13gal.
The boil was uneventful, hop additions were on time, and then I transferred the wort to two 5gal ported Better Bottles. The transfer was accomplish by gravity feed, through my Brewer’s Hardware Hop / Trub Filter and my Keg Cowboy 40-plate Wort Chiller. Both worked flawlessly, giving me clear, cooled wort. A quick check with my refractometer showed all of my gravities were spot-on, so I added the yeast and put the carboys into the fermentation chamber.
My checklist now has an entry to double check for the false bottom.

